Destiny 2 Deep Stone Crypt - Do You Have What it Takes?
Whether you're hunting down the Raid's exotic weapons or farming Spoils of Conquest, you won't want to go into this Raid blind.

Whether you're hunting down the prestige of Seals or farming Spoils of Conquest, you won't want to go into this Raid blind. So buddy up (or call in the CarrySquad!) and claim victory with the tips and tricks you'll learn here.
While Deep Stone Crypt may be familiar, don't let yourself get caught off guard - Deep Stone Crypt is back to provide the pinnacle of challenges. Players can obtain Spoils of Conquest from the Raid, and Deep Stone Crypt is arguably the best source of this currency. Earned through chests and encounters, Spoils of Conquest will allow Guardians to purchase Deep Stone Crypt gear, as well as any gear from prior raids. So how do you get all this neat stuff? Glad you asked.
Deep Stone Crypt's first encounter is Vault Security. The top floor is comprised of two large rooms, one light and one dark. A single basement level runs beneath these large rooms and can be accessed at the base of the map.
Both rooms have three fuses on their inner wall. Your goal? To destroy these and four smaller, standalone cylinders scattered across the main floor. These four cylinders extend below to the floor to the basement, where a control panel is attached to each. The cylinder that’s furthest into the basement area from the entrance has a second panel on a wall nearby. That’s a total of ten control panels, split evenly between the two rooms. You'll want to number these in a way that you'll remember. You can see through the glass floor to the control panels in the basement below, and at the start of the encounter you can all go into the basement to look around and get the lay of the land.
There are two buffs, the red operator and yellow scanner, and three augment machines where the buffs can be deposited and picked up. Only the operator can activate the control panels, either by shooting or punching them. To trigger a damage phase, the operator has to shoot four of the ten panels in the basement. It's important to note that you'll need to shoot two on each side; shooting the wrong panel triggers a cooker in the basement that kills the operator. The scanner buff allows you to identify which panels to shoot by highlighting them with a gold glow.
The fuses in the center wall correspond with miniature versions on a display in the basement that will be highlighted in the sequence you need to shoot them.
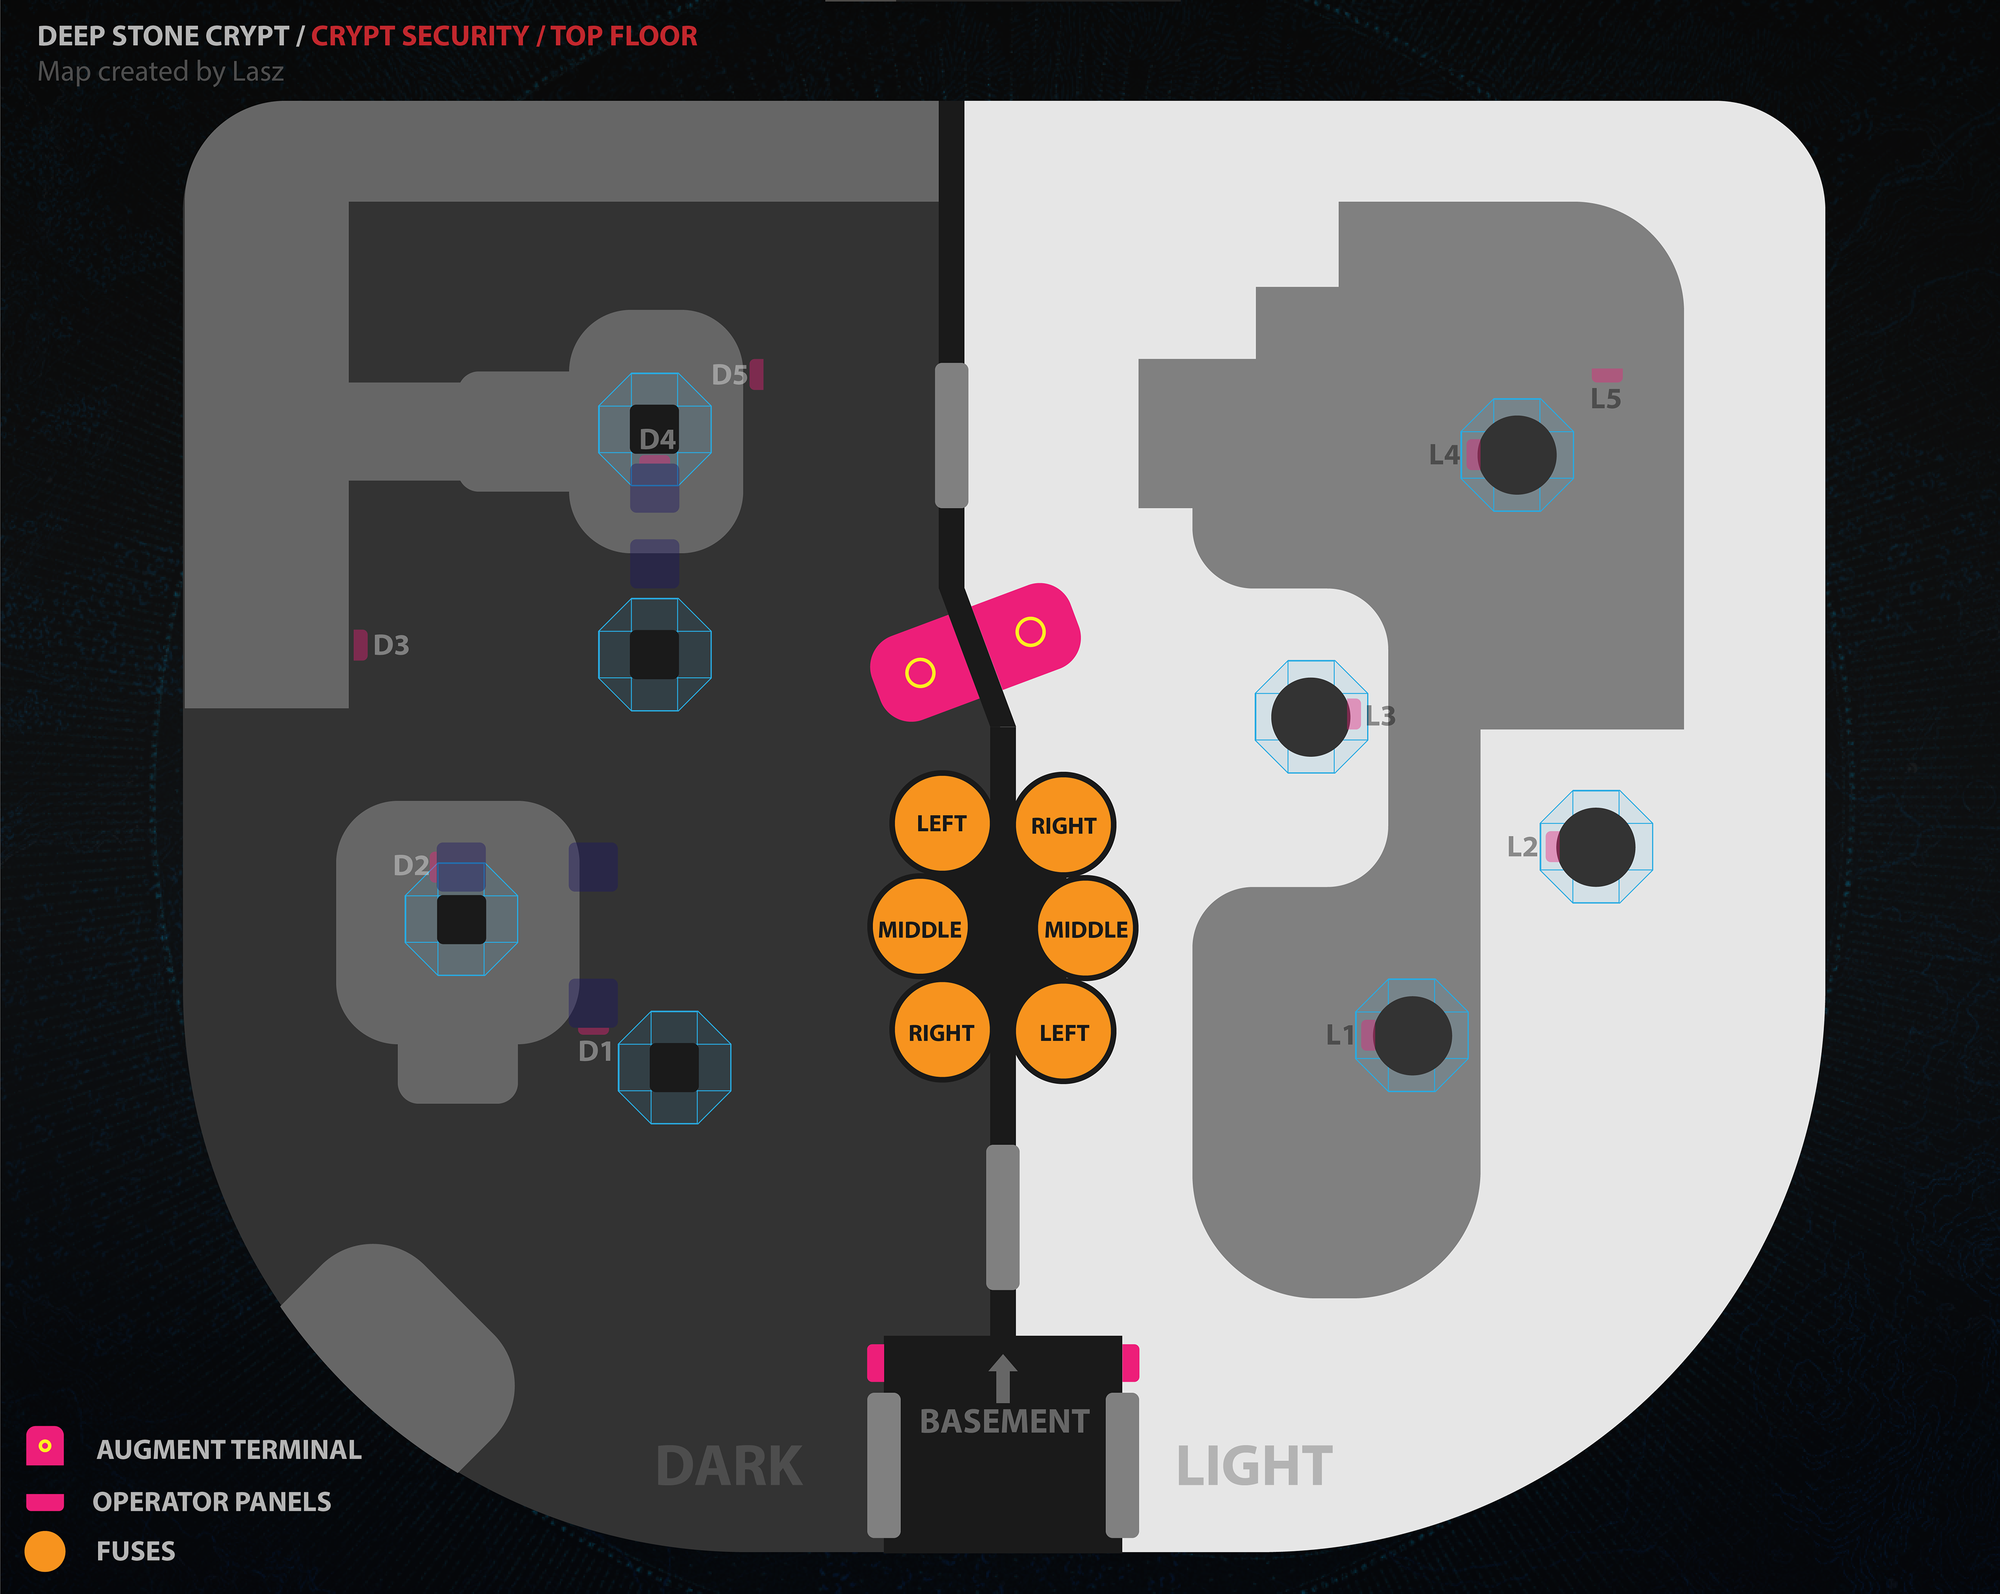
Now, here's where the action starts. When the encounter begins, the doors between the basement, and two rooms will all be locked. The challenge is to trade the scanner buff between sides, so that you can identify and call out the correct panels to shoot for the operator. To further challenge you, Sentinel Servitors will spawn and prevent the augment trading machines from working.
The 2nd encounter - Atraks-1 - provides a major challenge for your DPS. There's a bunker on Europa where you enter, and a larger, more spread out room on a space station, which you can access via four rocket pods at the back of the ground room. Each room is split roughly into three lanes, and each lane has an augment swapping machine.
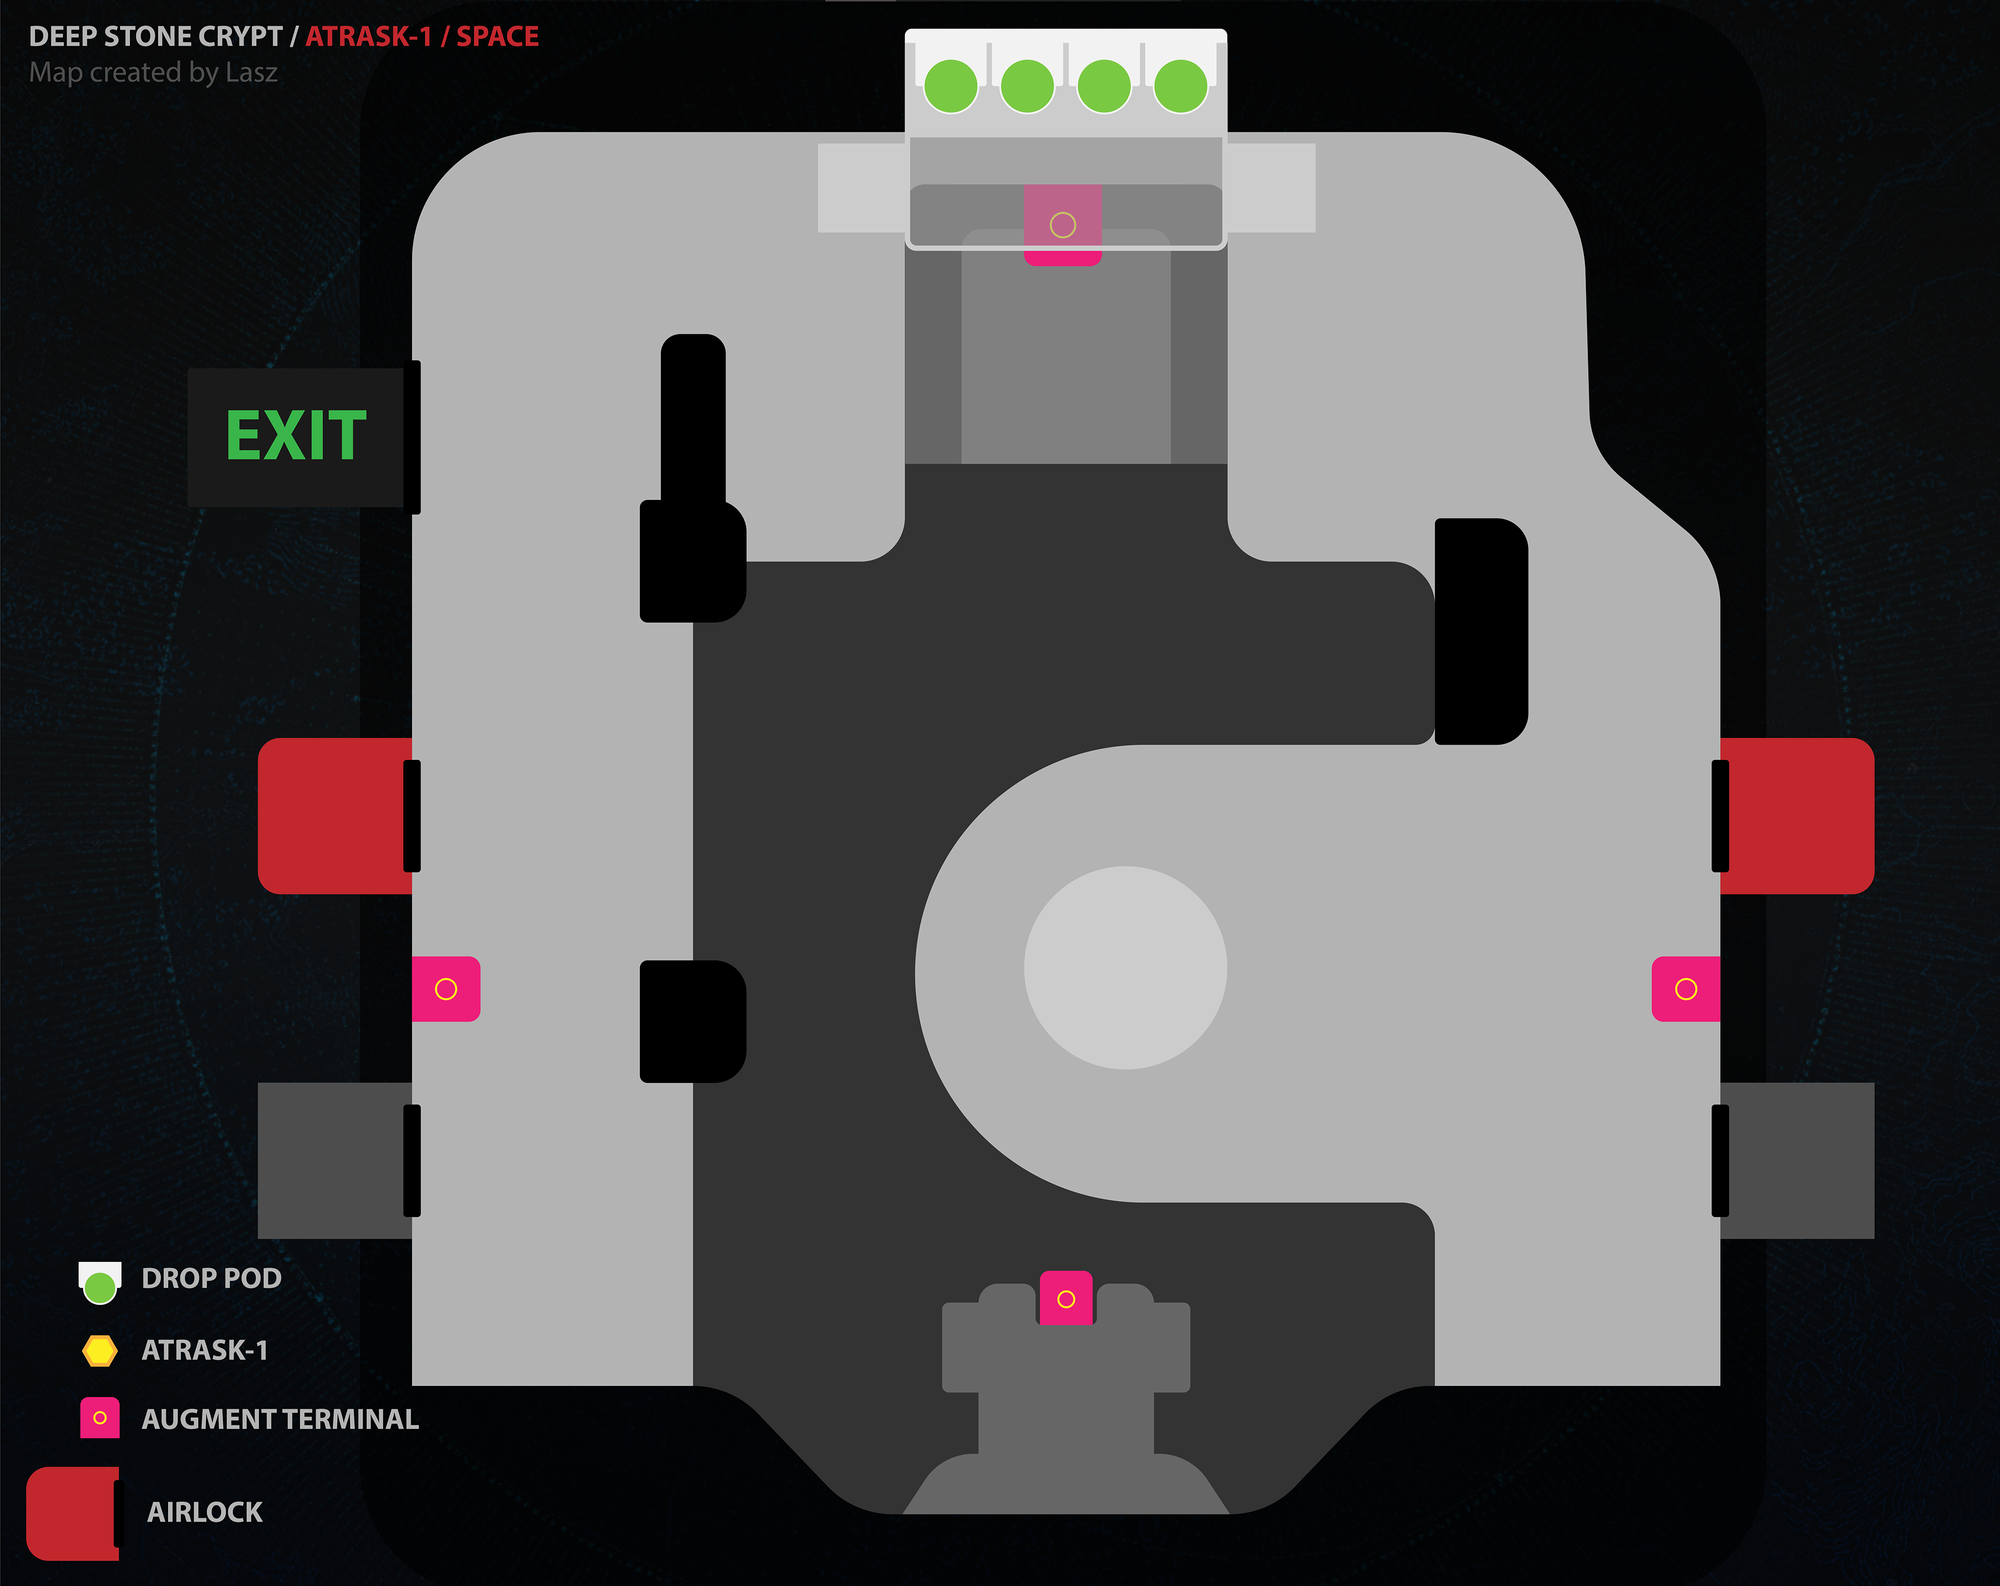
When the encounter begins, four duplicates of Atraks-1 will spawn in each room for a total of 8. Additional enemies will spawn in waves, and you'll need to work your way to eliminating six Servitors. When all six Servitors are killed, the eight Atraks-1 will start casting a wipe nuke. Once the wipe animation begins, the scanner will be able to see that one of these doppelgangers is glowing. You need to focus your damage into this duplicate to interrupt the nuke, but this is also your chance to actually damage the boss. You need to deal enough damage to trigger Atraks’s ‘last stand’ phase before it enrages and kills you all anyway.
To make it harder, whenever you kill one of the Atraks-1 duplicates, it’ll leave behind a glowing purple aura containing the ‘Atraks-1 Replication’ debuff, which a player should pick up. This has a timer of 45 seconds which you can only see when you’ve got the aura, but which is ticking down all the time anyway. What happens if it hits zero? It’ll spawn another Atraks-1 who will finish wiping you all. If the operator shoots you when you’re carrying it, it’ll reset the timer and knock the aura loose onto the floor, at which point you can pick it up again.
To get rid of these auras permanently you need to eject them into space. Four airlocks adjoin the space room, controlled by panels which the operator must shoot to open. Once an airlock is opened you have a short time before it shuts and ejects its contents automatically. This gives players carrying an aura the chance to enter, the operator to shoot the aura loose, and players to return to the space room.
Once you've defeated all the replicants, you can proceed to the 3rd encounter - Taniks, Reborn. Players will have a chance to catch their breath, as its main purpose is to introduce new mechanics in preparation. This encounter introduces the third suppressor buff, and the need to safely dispose of nuclear cores.
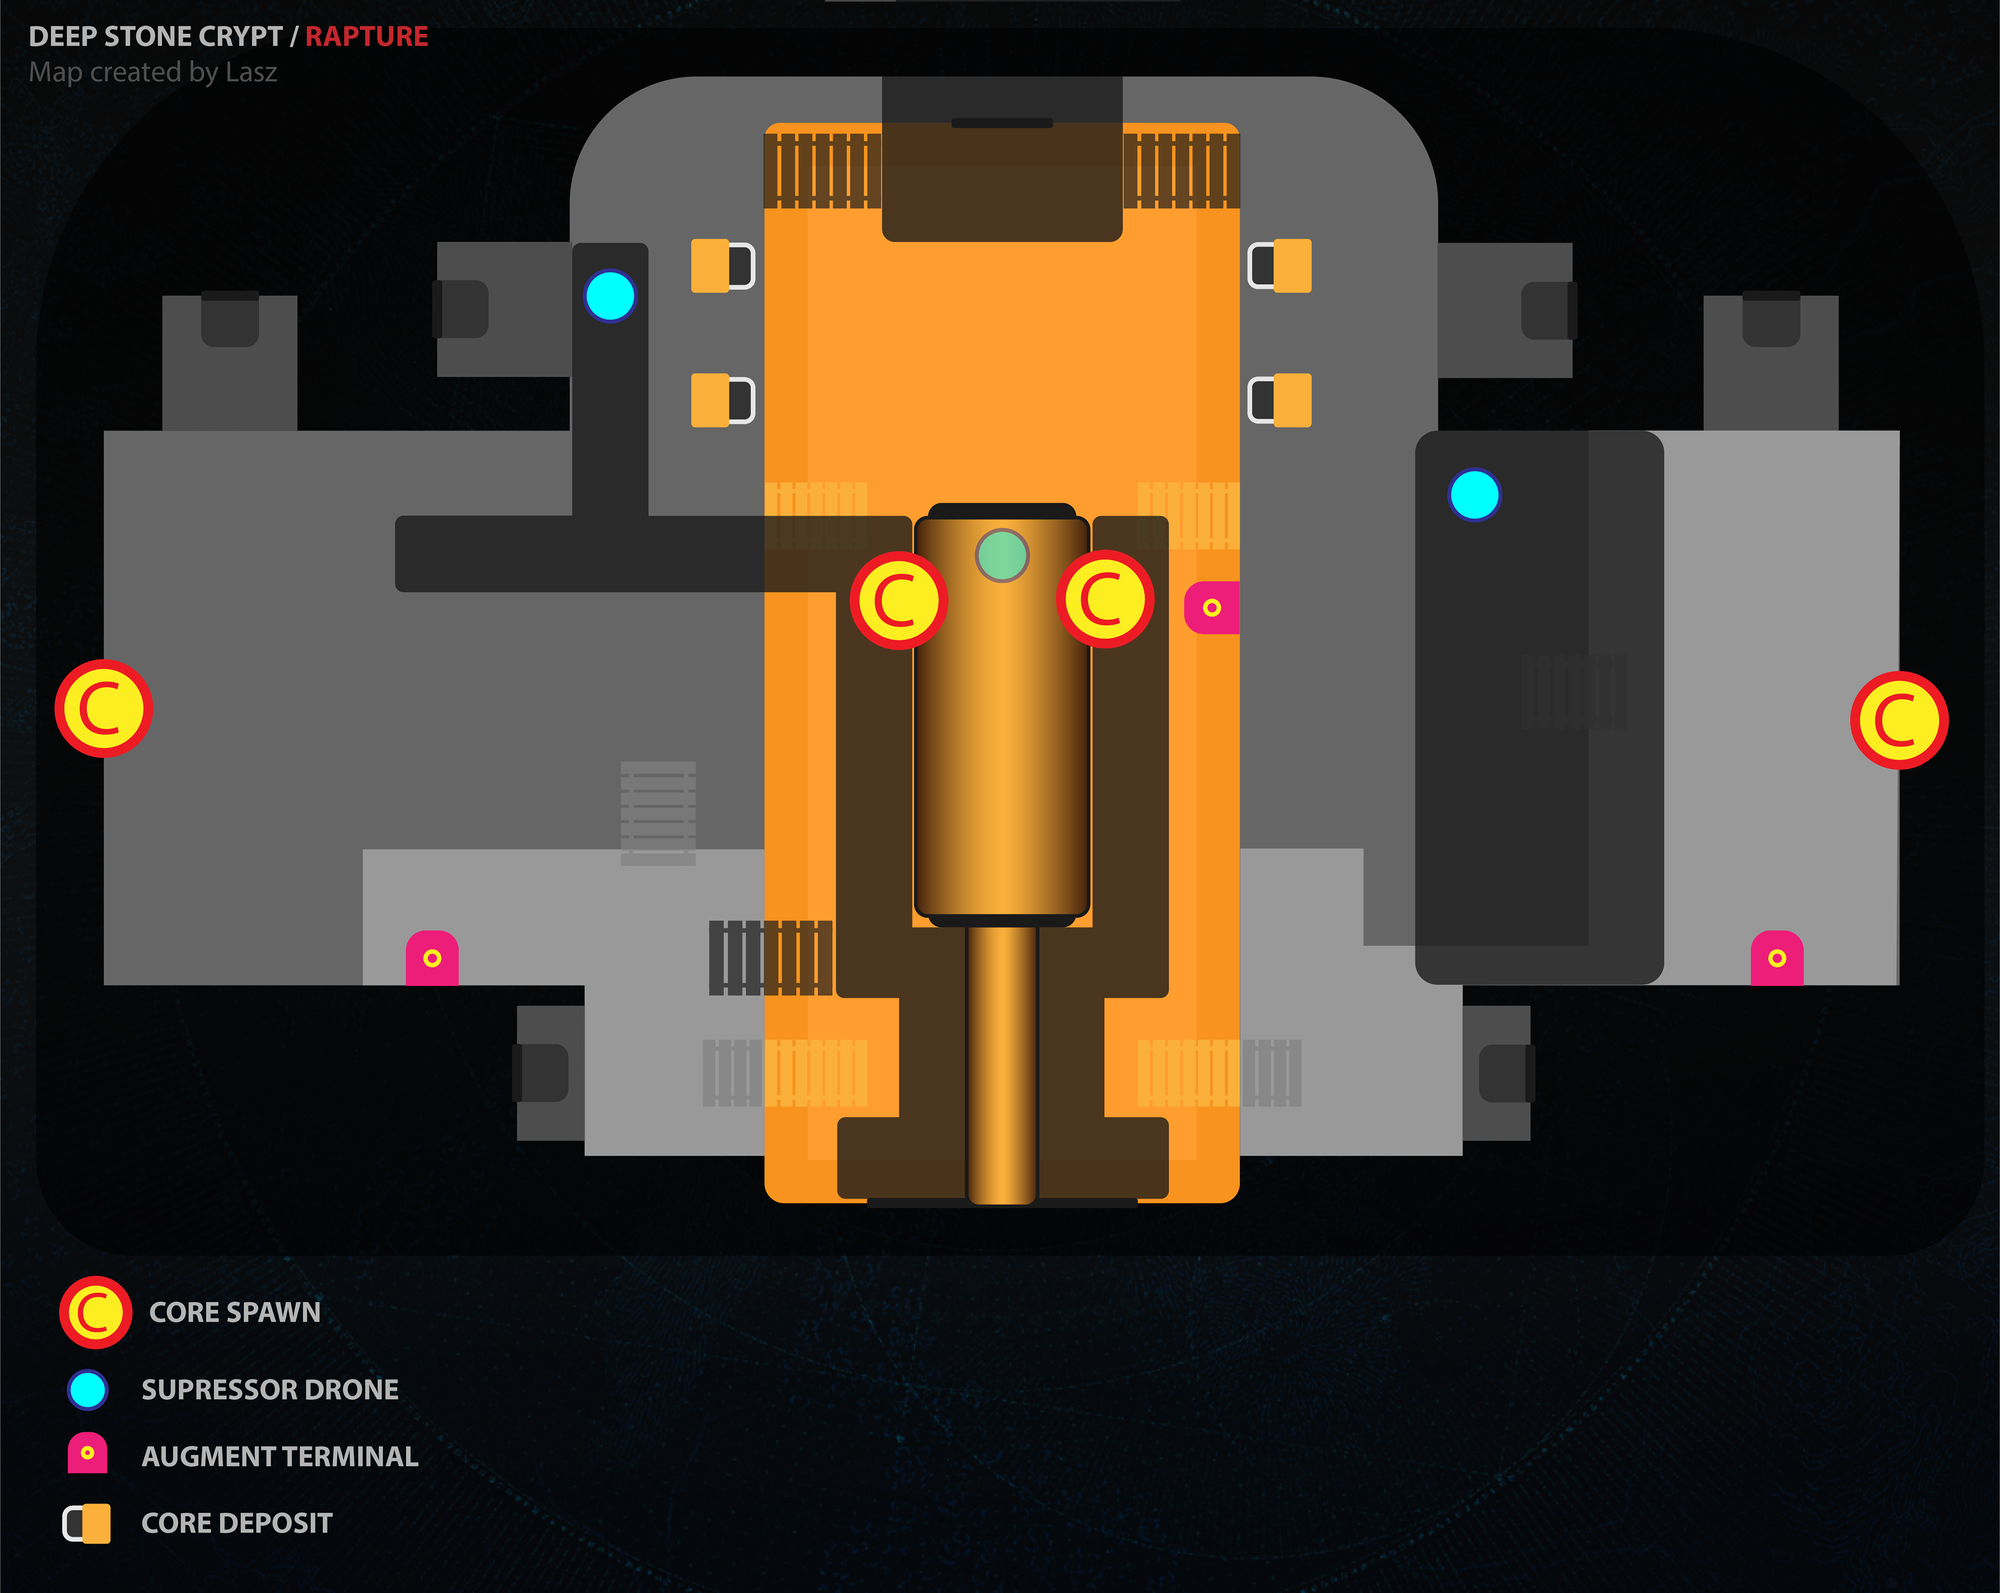
The new suppressor role joins the operator and scanner in this encounter. The suppressor will need to stun Taniks by shooting him while standing under the security drones dotted around the arena. After successfully stunning Taniks three times, it allow some bins to unlock. Now you'll be able to drop nuclear cores into these bins to get rid of them.
The operator and core runner act as the players escorting cores to the glowing bins. The scanner must identify for the operator and core runner which bin to deposit the core into. Finally, the suppressor must keep Taniks at bay, stunning him while the other players safely go about disposing of nuclear cores. Communication is key here, and if all goes well, you'll be moving on to the fourth encounter.
The fourth and final encounter has players going up against Taniks, the Abomination. One side of the arena is an empty void, and on the other, there are three distinct sections. Your spawn area, an orange area, and a blue area. Each of these three sections has an augment machine, and a pair of white bins. You'll want to agree on names for each of these with your team once again and make sure you'll be able to remember which is which.
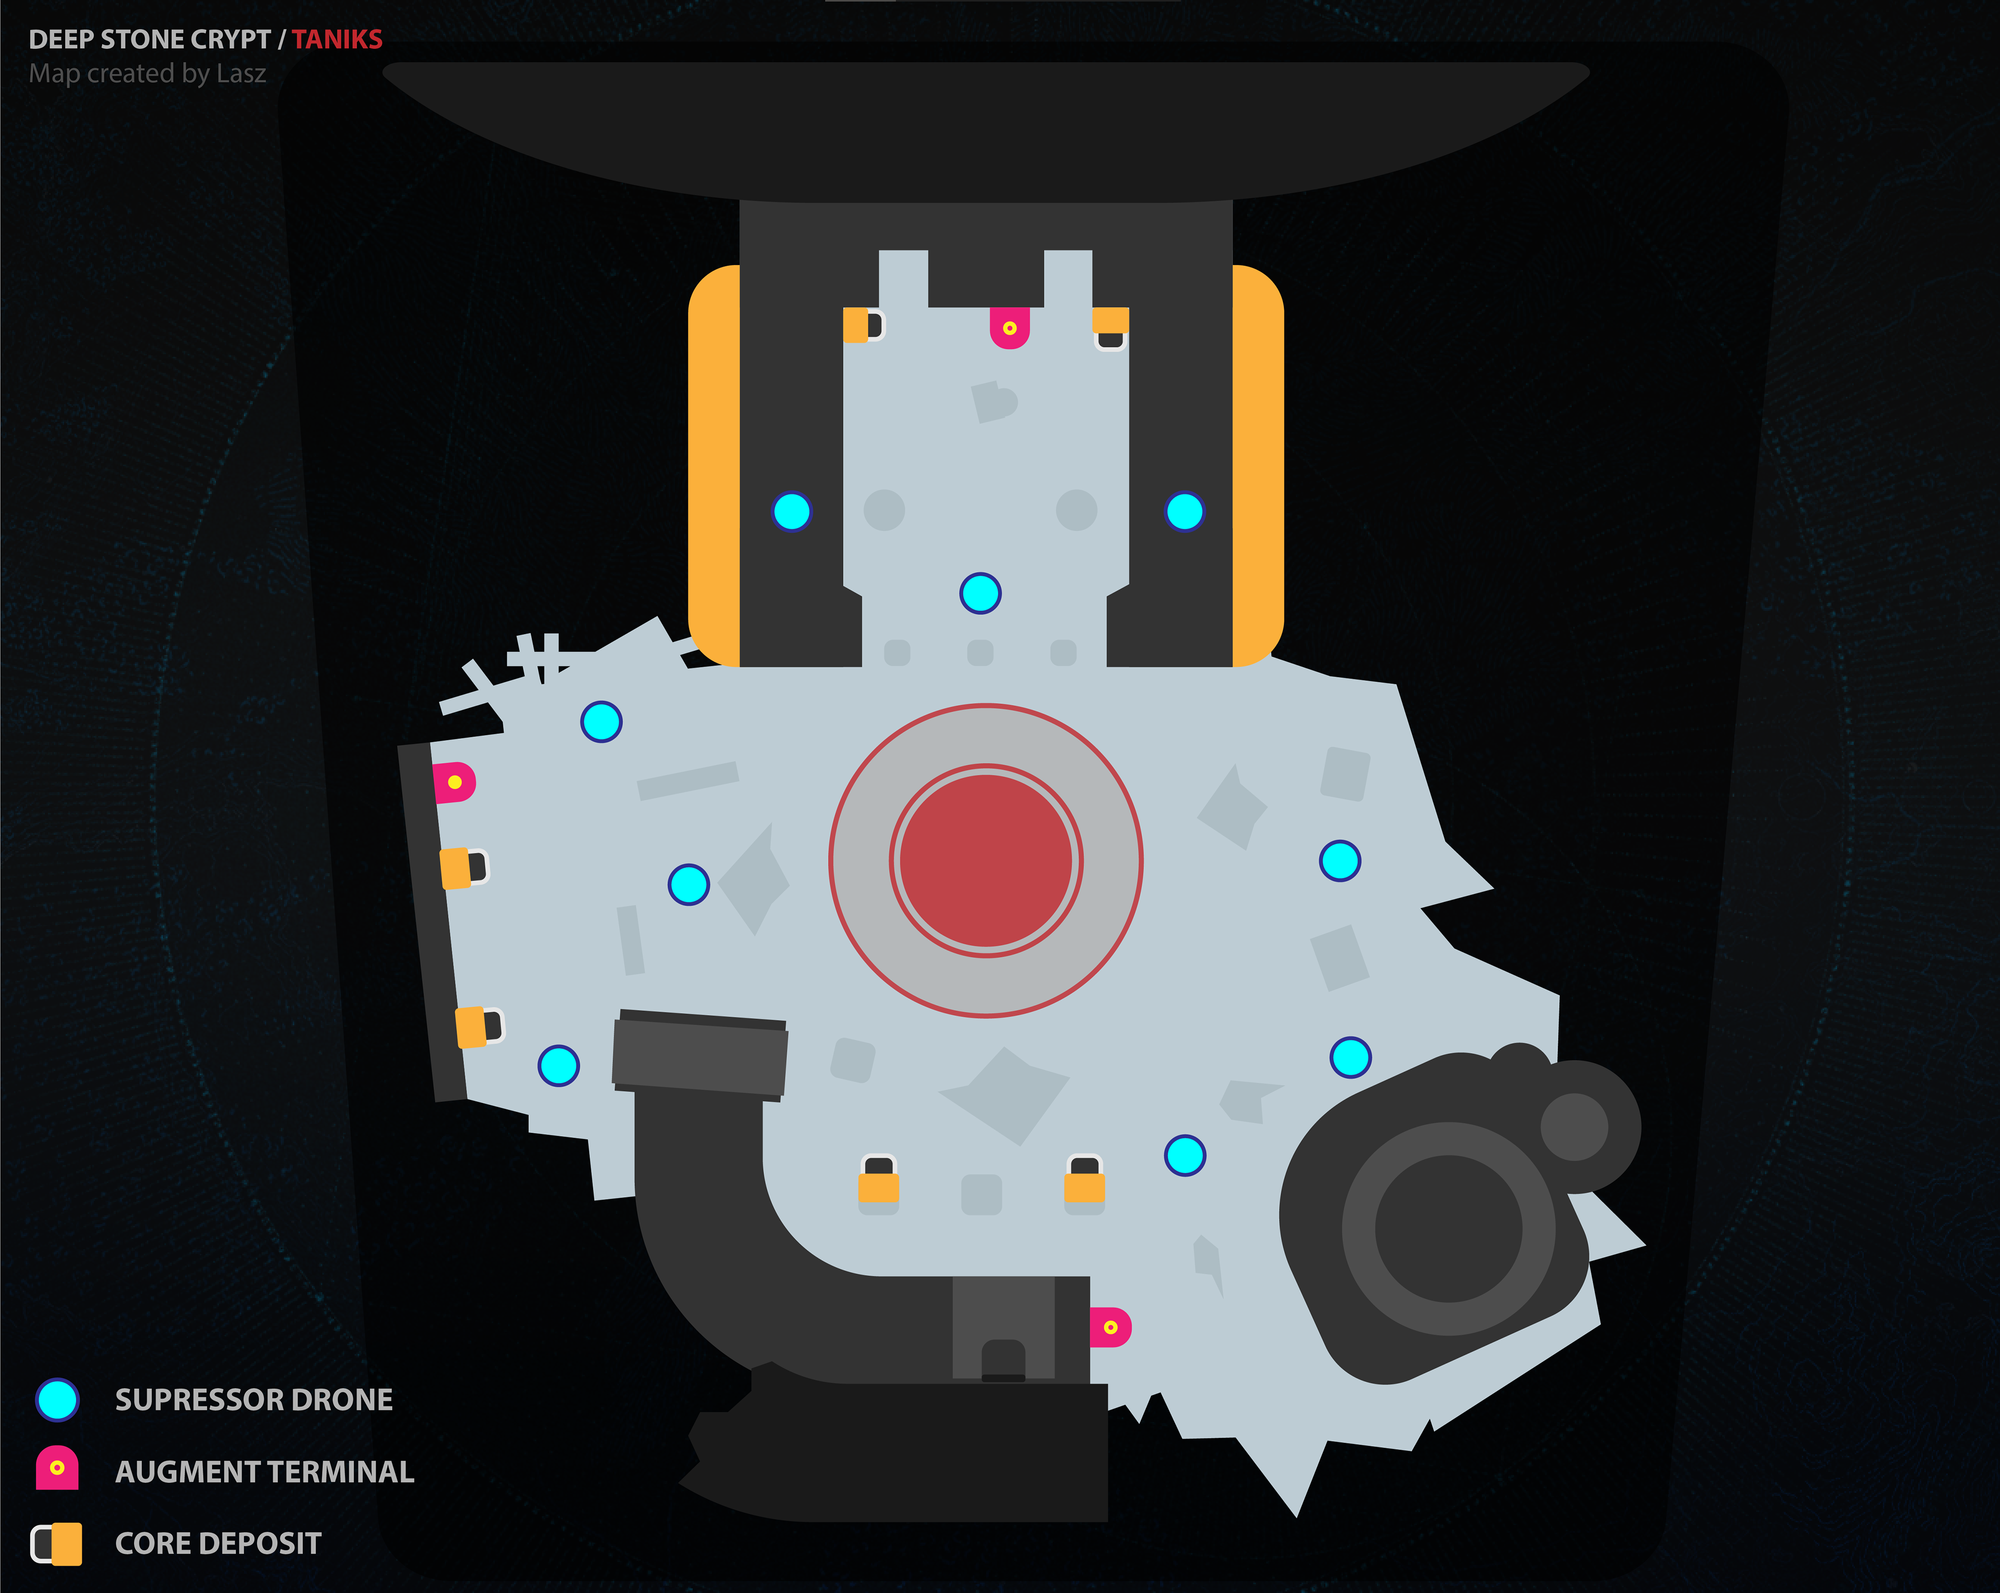
When the encounter starts, Vandals will appear at each section with each of the three buffs: operator appears at spawn, scanner at blue, and suppressor at orange.
At a certain point, Taniks will move from the center to one of the three sections and start casting a series of aerial strike attacks. The impact zone will be marked by purple columns. Avoid staying still and you should be able to easily avoid these. The four thrusters on the sides of his hover-sled will be glowing orange. Each player will need to shoot them, but only two at a time. Deal enough damage, and each thruster will drop a nuclear core.
Runners will need to take these cores and drop them in the bins once again. Two bins will be highlighted to whoever has the scanner buff. Putting a core in the wrong bin will kill you, so communication is key.
When carrying a core your movement is slowed, you can’t fight, and will gather stacks of the Radiation debuff. When it hits ten you die, so you need to be running with a buddy. Runners can also get detained by a red holding sphere, at which point they’re even more vulnerable since they can’t move. Whoever holds the operator buff can release them by shooting the sphere, so stay alert!
The bins must be unlocked by the suppressor before the cores can be dunked. Three of the floating white spheres around the arena will glow during this phase, at which point the suppressor needs to stand under each of these and shoot Taniks. Once all three spheres have been used and Taniks staggered, the bins will open and be available for dunking. Repeat this process twice and dunk all four cores to trigger a damage phase.
During the damage phase, Taniks is in the center of the arena surrounded by a bubble, which you need to be inside in order to hurt him. Drop your Well of Radiance on the edge of the bubble or slightly inside of it so you can stand in it and hit him. If you get knocked out of the bubble, don't worry, just hop over the debris to avoid an insta-kill and keep at it. Rinse and repeat these steps until you can claim your spoils!
The most important tip for this Raid is communication. Between all the buffs and debuffs, you'll need to constantly be calling out to your teammates and vice versa. Prepare your weapons ahead of time, and make sure to include a sword or two among you. Don't think your friends have what it takes? Want to brag about your success? CarrySquad is here to ensure you claim victory on your Raids!
Source: PCGamesN by Richard Scott Jones
Maps created by: Lasz

